2nd part
Speaker setting
Finally, we can set our loudspeakers!
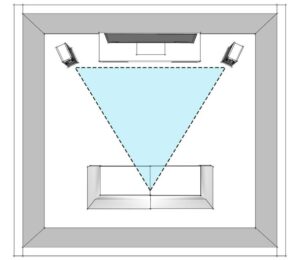
And now set up the monitors so that they would be symmetrical (Sz/2) compared to the middle of the shorter wall (Sz). In other words, the right and left loudspeakers and the distance of the wall closer to them should be equal (M). We measure the distance between the loudspeakers (A) from the tweeters’ center. This should be equal to the distance between our loudspeaker and our ears (A). That is our head and our loudspeakers should form an equilateral triangle with all sides being “A”.
This is inevitable for the correct stereo image. Turn the speaker boxes facing you. If you have positioned the monitors really in an equilateral triangle the angle between the centreline of the loudspeaker and the opposite wall should be exactly 30 degrees You can check this angle compared to the mixing board or our table as their half wavelength extinction frequency sides must be parallel with the wall.
-

 Bass sound dampening panels with wood membranes91 € – 268 € +Vat
 -
Absorption panels with diffuser-Two in one62 € – 296 € +Vat
Where should we turn the loudspeaker?
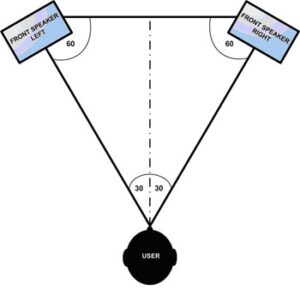
Tony Maserati multiple Grammy Award winner sound engineer said: when we are sitting in the monitoring position and turn our head to see the loudspeaker, we shouldn’t see the side of the box only its face plate which contains the loudspeakers. He turns his monitors towards himself so that the crossing of the lines started from the tweeters is not precisely at his ears but some centimeters behind his head. Rod Gervais: In his book Home recording studio… he defines this distance as 16 coll which is about 40 centimeters. That shows us that people like and use different things. Tony shares another useful piece of on with us… He learned that loudspeakers must be as far from each other as our arms stretched out to both sides. In this case, our palms will be exactly at the center of the tweeters. It is interesting… (Tony Maserati: Tannoy).
To prevent the development of problematic interferences avoid equal distances between the monitor and the different walls. These distances should be not only different but avoid the multiples of the distances including the distance of one and a half times. For example, if our loudspeaker is 1 meter from a wall then it should not be 2,3,4, etc., or 0,5, 1.5, 4.5 meters from a neighboring wall (or from the floor).
Use programs to solve this issue
Some programs may our life and do a part of the calculations instead of us. After entering the dimensions of the room one of these calculators indicates the location where it is worth placing the loudspeakers. Link: http://noaudiophile.com/speakercalc/
Positioning and height of the monitor speaker
According to ITU standards, it is 120-140cm. Hanson Hsu, the maker of brand-new and revolutionary ZR acoustics goes further as he observed that in the most popular studios of the world the center of the tweeter is exactly 1219mm from the floor level.
Specificity of the human hearing is that its directional characteristics are better at higher frequencies, i.e. we can better determine the direction of the source of higher frequencies than that of the low frequencies. In the stereo image, high frequencies provide the direction of the sound therefore it is important that the tweeters face our ears and they should be at an equal distance.
Tilt the loudspeakers if it is necessary
If it is necessary to tilt the monitors towards the floor so that the tweeters face exactly towards our ears, this tilt should be a maximum of 15 degrees. But if we move back and forth, we will not hear the high frequencies equally.
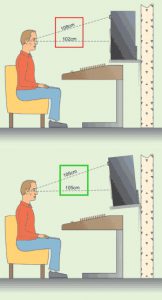
An interesting concept is that by tilting the monitor the tweeter and the woofer get to an equal distance from our ears (in our example 105 cm). But people don’t use this in every studio in case of near-field monitors, thus it may not change the result significantly. But the main monitors are developed tilted in almost all cases.
Distance of the loudspeaker from the wall
The distance between the loudspeakers and the walls of the room has a big influence on the strength of the low frequencies. Why? The directional characteristics of the loudspeakers are much more omnidirectional – i.e. ball characteristics, they are emitting in every direction – regarding the low frequencies than in the case of higher frequencies. (The higher frequencies are much more directed.) This effect from 500Hz downwards and 125Hz takes completely the shape of a ball. Thus, the bass is emitting in every direction resulting in a buzzing uproar.
The direction of bass by proper positioning of the loudspeaker
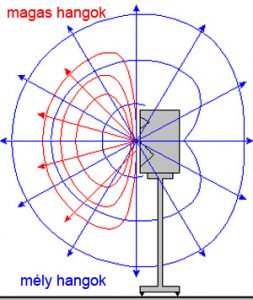
Thus, the bass sound waves diffuse not only in one
direction –
forward – but they go through the back of the loudspeaker straight to the wall opposite us (towards the back of the loudspeaker) and they bounce from there. When these waves meet the waves coming forth from the loudspeaker an acoustic interference is formed.
If the loudspeaker is at a distance equal to a quarter of the wavelength from the wall behind it the two waves will cancel each other out due to the interference. The cancellation is always at the loudspeaker placed at a distance equal to 1/4 of the wavelength, no matter in which phase the sound wave is.
-
Art diffusers 60x60x6cm129 € – 168 € +Vat
-

 Corner bass trap with membrane-108x64x23cm135 € – 142 € +Vat
Why?
Because the return way of the sound source being at 1/4 of the wavelength to the source is 2×1/4, i.e. 1/2… which means that the emitted and reflected wave is always in a 180-degree different phase. As they are equal but with opposite amplitude, therefore, they completely cancel each other out. This is what we call the boundary effect. This phenomenon results in big cuts in the frequency range and influences the bass reproduction much more than the standing waves. Unfortunately, we can fix this error only by correct monitor positioning and acoustic dampening. If we have loudspeakers not built into the wall the boundary effect will always be present.
We can significantly decrease the boundary effect with acoustic panels.
We can visualize this in the following Excel table: SBIR calculator.
The first cancellation peak is usually 2/3 octave wide.
We can position a monitor speaker in two ways to decrease the cancellation
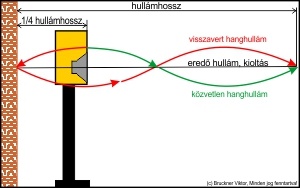
1. Put the monitors as close to the wall in front of you (behind the monitors) as possible.
The closer you bring the speaker box to the wall the higher frequencies the cancellation effect will prevail. This is good news because the higher frequencies are much more directed and we can dampen them much more effectively e.g. with an acoustic absorber. To minimize the SBIR effect we should try first the distance between 0-20 cm. It is important to check the minimum wall distance in the instructions for the monitor because in the case of certain (rather smaller) models this effect is included in the sound of the loudspeaker and if you fail to position the box according to the instructions you will not get the expected sound quality.
Small acoustic dampening
At very small distances, an acoustic panel of 10 cm behind the loudspeakers can properly dampen the cancellation effect. Broadband bass traps are even better. Of course, it depends on the room as well. The bigger the distance from the wall the less effective the acoustic dampening.
Attention!
If you use very small monitor speakers do not place them too close to the wall! These small monitors are emitting in every direction also in the low-mid frequency range and by placing them close to the wall the cancellation effect is stronger in the low-mid frequency range which produces audible tone coloring. The monitors having their bass reflex hole on the rear side of the box may not be placed closer to the wall than is permitted in the instructions.
A quick tip for the positioning of the loudspeaker:
You don’t have to power the loudspeakers placed close to the wall too much achieving thereby higher volume and lower distortion. But, unfortunately, due to the near field effect, there will be a bass peak (the same when we put our microphone too close to the sound source) but we can easily handle this with an EQ or acoustic panel Even better if we have a calibration software do the EQ setting, e.g. IK Multimedia ARC2, or ROOM EQ WIZARD (REW).
-
 Bass acoustic wall panels with double leather membrane83 € – 260 € +Vat
 -
 3D acoustic diffuser 70x70x10cm122 € – 139 € +Vat
2. Place the loudspeakers at such a distance from the wall that the interference decreases
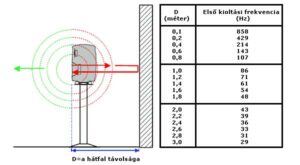
The more we increase the distance between the wall and the loudspeaker the less the extinguished frequency value will be. If we choose this theoretical distance so that the extinguished frequency is lower than what our loudspeaker can emit, we will not hear the boundary effect. This is a good choice only if we have a room big enough.
We can calculate the canceled-out mid-frequency with the following formula:
Fc=c/4 x D
Fc –> the extinguished mid-frequency
c –> speed of sound (343 m/s)
D –> the distance between the membrane of the loudspeaker and the wall behind it in meters (not the distance between the speaker box and the wall!!! See the picture)
Generally speaking, in the case of a two-way monitor (this is what people call speaker boxes containing 2 loudspeakers) you have to be most careful in the range between 40-80 Hz, and do your best in case of frequencies between 80-200 Hz.
Therefore, the the in case of a typical studio monitor the recommended wall-loudspeaker distances
Good: Built into the wall or as close to the wall as possible
- Acceptable: 0.1-1 m
- not recommended 1-2,2 m
- Good: above 2.2 m
Of course, we can calculate the optimal wall-loudspeaker distance if we know the frequency of our loudspeaker where the bass starts to die away with 3dB. This is what we call the low cut-off frequency of the loudspeaker.
Dmin=(1,4×343) / 4 x F-3dB
Dmin –> minimum distance between the loudspeaker and the wall behind it in meters
(1,4×343) — > constant=480,2
F-3dB –> the frequency where the low cut-off point of the loudspeaker is, i.e. where the diagram of the sound pressure falls 3dB.
Example:
The low cut-off point of a loudspeaker is 55 Hz. How far it should be placed from the wall?
1st step: 4 x 55=220
2nd step: 480.2 divided by 220 = 2.181818. It should be placed 2.18 m from that order that the bounty effect gets to such a low frequency where the extinction can’t be heard anymore.
In case of large loudspcan can emit very low, frequencies this method leads to very big distances, therefore, not be used in home studios. The other problem is that in case of long distances the side walls and also the floor-ceiling distances will be included in the formula. In this case, the best choice is a monitor built into the wall as we can see in big studios.
Bass cut and the monitoring distance from the rear wall
In, small rooms the biggest problem is the bass reflected from the rear low-frequency frequency sound pepeaksause peak at frequencies of 1/2, 1, 3/2, etc. which are usually below 6dB and result in rather a high amount of echo. The bigger problem is that the wavelengths and 1/4, 3/4, and 5/4 cause cut, we don’t hear these frequencies.
In small rooms, it usually affects the range below 300Hz which can be quieter even by 30dB. In an ideal case our monitoring position is 3 meters from the rear wall, which shifts the quarter wavelength extinction effect into the frequencies below 30Hz. If you don’t have a such big room for a studio you should certainly place acoustic absorbing panels on that for low-frequency frequency sound waves. This is recommended also in a room that is big enough.
Cancellation effects are caused by waves reflected fthemheom the boundary walls.
The boundary effect is caused not only in the case of sounds reflected from the front wall. The floor, the ceiling, the,e side walls and also the rear wall all have this effect. Therefore, it is advisable to give acoustitoreatment for the whole room. Thus, we need a more general formula to calculate the extinction frequency.
-
Parametric Wall Art Panel (Diffuser)327 € – 426 € +Vat
-
Wood Acoustic Diffuser 60x60x6cm108 € – 140 € +Vat
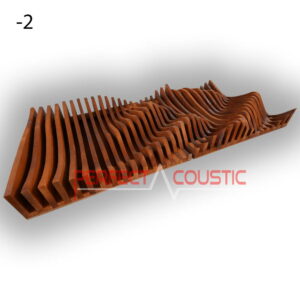
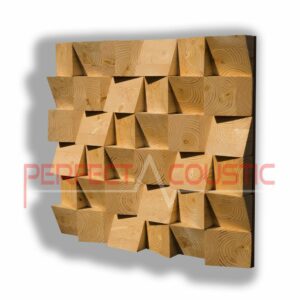
Half wavelength extinction frequency:
Fc=c/4 x D
Fc=c/2 x (D reflex – D direct)
Fc –> the extinguished mid-frequency
c –> speed of sound (343 m/s)
D reflex –> the distance that the sound covers between the loudspeaker and our ears reflected from the walls
D direct –> the distance that the sound covers from the loudspeaker to our ears moving in a straight line.
You can use the same formula to calculate the mid frequencies that are reflected from your studio table or mixing board. and can see on the picture that the sounds are reflected also from the surfaces in front of the monitor, and on certain, frequencies they cause strengthening and extinctions on other frequencies the same way as those reflected from the wall. (E.g. This is why it is not advisable to put the near field monitors on the bridge of the mixing board.) The volume of these reflected sound waves is as much as of those reflected from the front wall thus, they can make much less trouble. You can test this phenomenon if you put a pillow or a folded blanket on the table or mixing board in front of the loudspeakers.
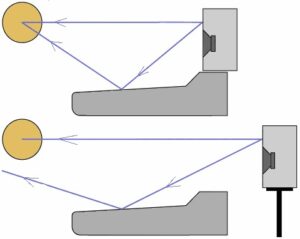
As can sin in the picture this problem is increased if our monitor is close to the reflecting surface, e.g. you put it directly on the table. If you can place the monitors only for a tab for any reason always raise them above the level of the table! By using table stands you can not only raise the tweeter of your monitors at the level of your ears but you can also hear a much “clearer” sound as a result of isolating it from the table.
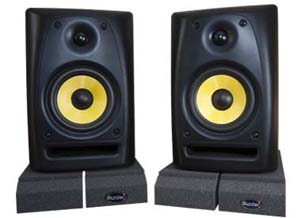
Raise the monitors always with a hard and stable thing. And put a vibration damper (open cell foam, Auralex Mopad, etc.) or Blue-tec glue between the stand and the monitor.
Comb filtering
The reflecting surfaces close to the monitor cause a comb-filter effect. This produces a tubular sound similar to a phaser or flanger effect. Therefore, never place any reflecting surface such as a wall, rack box, another loudspeaker, cabinet, etc. close to the loudspeaker. Also, make sure that the computer monitors are behind the level of the loudspeakers at all times and as far as possible from the front level of the speaker box. Reflections may come from these therefore it is worth tilting them. You can test it while listening to music…
to be continued… SzG